A Bite of Boulder Cookbook
Recipe Videos
View a few recipes featured in A Bite of Boulder cookbook.
- The Empire Lounge and Restaurant: Spicy Thai Shrimp Pasta (pg. 164)
- Bohemian Biergarten: Spicy Hungarian Chicken Paprika & Austrian Style Spaetzle Recipe (pg. 31-32)
Corrections
Oops! We goofed! In the hustle and bustle to produce our book we’ve discovered we printed some errors. Here’s the corrected instructions.
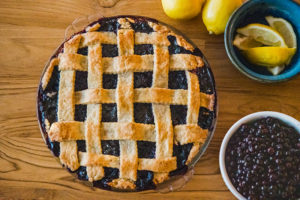
Photo by Christina Kiffney
Wild Blueberry Pie Recipe
*This is the continuation of directions for the Wild Blueberry Pie recipe on Page 87
To Make the Pie
- Preheat oven to 450.
- Roll out bottom crust — try not to stretch it — and place in a 9-inch, deep-dish glass pie pan.
- Add remaining frozen blueberries and top with filling from pan. Gently mix filling with blueberries.
- Top with crust and crimp the edges, sealing with water. If you don’t make a lattice, cut a few vents in the top crust to let the steam out. Brush top with milk.
- Bake on a cookie sheet in the low part of the oven for 30 minutes.
- Lower heat to 350 degrees and bake for another 40 to 50 minutes. Deep-blue thick juice should be bubbling up. Pick up the pie with oven mitts to make sure the bottom crust is lightly browned. Shield the crust if it’s browning too quickly, with an aluminum foil sleeve.
- Remove from oven and allow to cool for at least three hours before slicing, but do not refrigerate.
- Enjoy!
Supplements
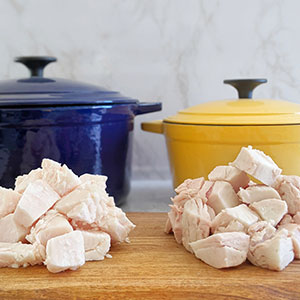
Fat Chunks (suet left, trimmings right)
Beef Fat
Pro tip! Some of our favorite recipes call for delicious beef fat (hello, Yorkshire Puddings on page 159!), but buying it by the jar can be expensive! Instead, ask your local butcher for their beef fat trimmings and render it yourself. A pound of fat costs just 99 cents at our local shop vs, $12 off the grocery store shelf.
Your butcher will likely have two varieties of beef fat for you to choose from, fat trimmings and suet. Beef fat trimmings are the fat from around the muscles leftover after butchering. Suet is specifically the soft fat from around the kidneys. We rendered down both varieties to compare, see what we found and get some DIY instructions on how to make your own below!
Beef Fat Trimmings:
Beef fat trimmings are the fat from around the muscles leftover after butchering. We found this fat to be tougher and darker in color. There were obvious traces of muscle left behind on some parts of this fat, but we didn’t cut it off before rendering. Our butcher told us this variety of fat is typically added to ground game meats to add flavor. This variety is much easier to find.

Hot Liquid Fat (suet left, trimmings right)
Suet:
Suet is specifically the soft fat from around the kidneys. This fat is special as it is extra high in vitamins and essential fatty acids; it has a softer texture and a lower melting point. It is prized for its nutritional value and baking properties and is the variety utilized in soap or candle production. This fat was much whiter comparatively, felt a bit waxy, flaked apart easily, and began melting a bit just in our hands.
How to Render Your Own Beef Fat
There are many ways to render your own beef fat, but in this case we chose to do it low and slow in the oven. If you choose to do it this way, you’ll need a deep oven safe pot or dutch oven, a sieve or strainer, a bit of cheesecloth or muslin, and a jar for storage.
Ingredients
- 1-2 pounds Beef Fat
Instructions
- Cut the fat into 1.5 inch chunks.
- Place the fat into your pan and cover.
- Place in an oven at 250ºF.
- Cook down until a clear liquid fat has been rendered from the small pieces of fat. There doesn’t seem to be an exact science to this, but your goal is to get as much liquid fat out of those solid pieces as possible, without burning the fat. We cooked our for around 3 hours total.
- While the fat is still warm strain the liquid through a sieve into a clean bowl.
- Be sure to strain off all of the sold pieces. If any remain, strain a second time through cheesecloth. Straining off the solid pieces will lengthen the shelf life of your rendered fat.
- Once strained to your satisfaction, transfer the liquid fat into jars.
- Allow to cool and place in the refrigerator for long term storage.
- Rendered Beef Fat should keep for several months if properly stored in a cool environment.
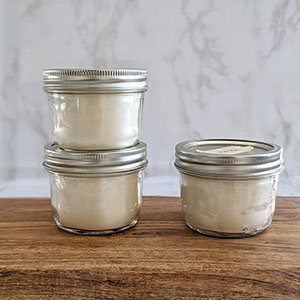
Final Solid Rendering (suet left, trimmings right)
After rendering both varieties of fat using the process described above this what we found:
Beef Fat Trimmings – Rendered:
Browned significantly as they rendered and resulted in a yellow liquid fat. This fat was extremely fragrant and had an intensely beefy flavor. One pound of raw fat = 9 oz of rendered fat.
Suet – Rendered:
Cooked down much further and resulted in a much clearer liquid fat. This fat has very little smell or taste. One pound of fat = 18 oz of rendered fat.
Preserved Lemons
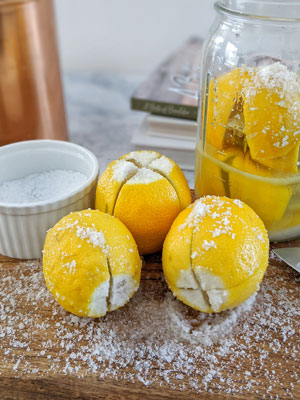
photo by Branded Beet
Chautauqua Dining Hall’s Crispy Brussels Sprouts are a stunner (find the recipe on page 55) thanks to the combination of crisp white balsamic and mellow preserved lemons every mouthful is a complex explosion of flavor that leaves you hungry for more.
Not familiar with preserved lemons? This versatile ingredient is little more than the sum of fresh lemons, salt, and time …. and is definitely something that you will want to have on hand next time you’re whipping up some Brussels for dinner.
How to Make Preserved Lemons
Ingredients
- 8-10 lemons
- 1/2 cup to 1 cup of salt (sea salt or kosher recommended)
- Extra fresh squeezed lemon juice, if needed
- Sterilized quart canning jar
Directions
- Thoroughly clean the lemons. Organic would be best here, but if you can’t find organic be sure to rinse the lemons in vinegar water.
- Cut off the ends of the lemons, approximately ¼ inch from the tip.
- Quarter each lemon, but keep the lemon attached at the base – making two deep slices just over 3/4 of the way through.
- Gently pull open the lemons and season well with salt, inside and out.
- Cover the bottom of your jar with salt. Place the lemon, cut side down into the salt on the bottom of the jar and press down firmly to release the juices. Put a teaspoon of salt on top of the lemon and repeat the process with a second lemon, again firmly pressing down to release the juice. Repeat this process until you have packed the jar with lemons.
- The jarred lemons should be well covered with juice. Add more juice if needed to completely submerge the lemons, and add a couple more tablespoons of salt to the top.
- Put the lid on the jar and let sit at room temperature for three days, shaking it and turning the jar upside down a few times per day. After 3 days, transfer the lemons to the refrigerator for at least 3 weeks before using, or until the rinds soften. Preserved lemons can be stored in the fridge for up to 6 months.
- To use the preserved lemons in cooking, remove from the jar and rinse away the excess salt. Discard any seeds and remove the pulp. Prepare the dish using only the preserved lemon rind.
Interactive Table of Contents
Quickly find what you’re looking for in A Bite of Boulder cookbook. Search by dish type, ingredient, dietary restriction, or browse our cocktails. Click on a column header to sort the table and quickly locate a recipe.
| Restaurant | Type | Recipe | Page # |
|---|---|---|---|
| Centro Mexican Kitchen | Appetizer | Queso Dip | 52 |
| Chimera Ramen | Appetizer | Chimera's Smashed Cucumber | 61 |
| Corrida | Appetizer | Patatas Bravas | 64 |
| Japango | Appetizer | Hamachi Carpacchio | 76 |
| OAK at Fourteenth | Appetizer | Kale Salad | 94 |
| SALT | Appetizer | Butternut Squash Soup | 118 |
| Santo | Appetizer | Red Chile Posole | 126 |
| Steakhouse 316 | Appetizer | Oysters Rockefeller | 136 |
| Verde | Appetizer | Guacamole | 140 |
| Zolo Grill | Appetizer | Cactus & Corn Fritters | 152 |
| Avery Brewing | Entrée | Barbacoa Tacos | 12 |
| Basta & Dry Storage | Entrée | Pizza al Taglio | 16 |
| Black Cat Farm Table Bistro | Entrée | Stuffed Summer Squash with Ratatouille and Taleggio | 20 |
| Blackbelly | Entrée | Skirt Steak & Chimchurri Sauce | 29 |
| Bohemian Biergarten | Entrée | Spicy Hungarian Paprika Chicken | 31 |
| Boulder Cork, The | Entrée | Sake Salmon | 37 |
| Boulder Dushanbe Teahouse | Entrée | Tajik Plov Rice | 41 |
| Cafe Aion | Entrée | Cafe Aion Paella | 48 |
| Empire Lounge & Restaurant, The | Entrée | Spicy Thai Shrimp Pasta | 164 |
| Greenbriar Inn, The | Entrée | Garden Vegetable Risotto and Maine Lobster | 70 |
| Jax Fish House | Entrée | Crab Cakes with Lemon Aioli | 81 |
| Leaf | Entrée | Udon Kombu Noodle Bowl | 90 |
| Roadhouse Boulder Depot | Entrée | The "Jam" Burger | 114 |
| Acreage by Stem Ciders | Side Dish | Green Beans Amandine | 158 |
| Acreage by Stem Ciders | Side Dish | Yorkshire Pudding | 159 |
| Bohemian Biergarten | Side Dish | Australian Spaetzle | 32 |
| Chautauqua Dining Hall | Side Dish | Crispy Brussels | 55 |
| River & Woods | Side Dish | Root Vegetable Latkes | 108 |
| The Post Brewing Company | Side Dish | Collard Greens | 105 |
| West End Tavern | Side Dish | Campfire Brisket Beans | 145 |
| West Flanders Brewing | Side Dish | Mac + Cheese | 148 |
| Corrida | Cocktail | Bright Gin & Tonic | 65 |
| OAK at Fourteenth | Cocktail | Across the Atlantic | 95 |
| River & Woods | Cocktail | Passionfruit Habanero Mule | 110 |
| Steakhouse 317 | Cocktail | 20th Century Gin Cocktail | 137 |
| Verde | Cocktail | Colorado Cadillac Margarita | 141 |
| Acreage by Stem Ciders | Dessert | Lemon Curd | 160 |
| John Lehndorff | Dessert | Wild Blueberry Pie | 87 |
| Shine | Dessert | Ice Cream Sandwich | 130 |
| Restaurant | Type | Recipe | Page # |
|---|---|---|---|
| Centro Mexican Kitchen | Starters | Queso Dip | 52 |
| Chimera Ramen | Starters | Chimera's Smashed Cucumber | 61 |
| Verde | Starters | Guacamole | 140 |
| Zolo Grill | Starters | Cactus & Corn Fritters | 152 |
| Avery Brewing | Fish & Meats | Barbacoa Tacos | 12 |
| Blackbelly | Fish & Meats | Skirt Steak and Chimchurri Sauce | 29 |
| Bohemian Biergarten | Fish & Meats | Spicy Hungarian Paprika Chicken | 31 |
| Boulder Cork, The | Fish & Meats | Sake Salmon | 37 |
| Japango | Fish & Meats | Hamachi Carpacchio | 76 |
| Jax Fish House | Fish & Meats | Crab Cakes with Lemon Aioli | 81 |
| Roadhouse Boulder Depot | Fish & Meats | The "Jam" Burger | 114 |
| Steakhouse 316 | Fish & Meats | Oysters Rockefeller | 136 |
| Acreage by Stem Ciders | Grains, Rice, Beans & Pasta | Yorkshire Pudding | 159 |
| Basta & Dry Storage | Grains, Rice, Beans & Pasta | Pizza al Taglio | 16 |
| Bohemian Biergarten | Grains, Rice, Beans & Pasta | Australian Spaetzle | 32 |
| Boulder Dushanbe Teahouse | Grains, Rice, Beans & Pasta | Tajik Plov Rice | 41 |
| Cafe Aion | Grains, Rice, Beans & Pasta | Cafe Aion Paella | 48 |
| Empire Lounge & Restaurant, The | Grains, Rice, Beans & Pasta | Spicy Thai Shrimp Pasta | 164 |
| Greenbriar Inn, The | Grains, Rice, Beans & Pasta | Garden Vegetable Risotto and Maine Lobster | 70 |
| Leaf | Grains, Rice, Beans & Pasta | Udon Kombu Noodle Bowl | 90 |
| West End Tavern | Grains, Rice, Beans & Pasta | Campfire Brisket Beans | 145 |
| West Flanders Brewing | Grains, Rice, Beans & Pasta | Mac + Cheese | 148 |
| Acreage by Stem Ciders | Veggies | Green Beans Amandine | 158 |
| Black Cat Farm Table Bistro | Veggies | Stuffed Summer Squash with Ratatouille and Taleggio | 20 |
| Chautauqua Dining Hall | Veggies | Crispy Brussels | 55 |
| Corrida | Veggies | Patatas Bravas | 64 |
| OAK at Fourteenth | Veggies | Kale Salad | 94 |
| Post Brewing Company, The | Veggies | Collard Greens | 105 |
| River & Woods | Veggies | Root Vegetable Latkes | 108 |
| SALT | Veggies | Butternut Squash Soup | 118 |
| Santo | Veggies | Red Chile Posole | 126 |
| Acreage by Stem Ciders | Sweets | Lemon Curd | 160 |
| John Lehndorff | Sweets | Wild Blueberry Pie | 87 |
| Shine | Sweets | Ice Cream Sandwich | 130 |
| Restaurant | Gluten Free | Dairy Free | Vegetarian | Recipe | Page # |
|---|---|---|---|---|---|
| Acreage by Stem Ciders | Green Beans Amandine | 158 | |||
| Acreage by Stem Ciders | Lemon Curd | 160 | |||
| Acreage by Stem Ciders | Yorkshire Pudding | 159 | |||
| Avery Brewing | Barbacoa Tacos | 12 | |||
| Basta/Dry Storage | Pizza al Taglio | 16 | |||
| Black Cat | Stuffed Summer Squash with Ratatouille and Taleggio | 20 | |||
| Blackbelly | Skirt Steak & Chimchurri Sauce | 29 | |||
| Bohemian Biergarten | Australian Spaetzle | 32 | |||
| Bohemian Biergarten | Spicy Hungarian Paprika Chicken | 31 | |||
| Boulder Cork, The | Sake Salmon | 37 | |||
| Boulder Dushanbe Teahouse | Tajik Plov Rice | 41 | |||
| Cafe Aion | Cafe Aion Paella | 48 | |||
| Centro Mexican Kitchen | Queso Dip | 52 | |||
| Chautauqua Dining Hall | Crispy Brussels Sprouts | 55 | |||
| Chimera Ramen | Chimera's Smashed Cucumber | 61 | |||
| Corrida | Patatas Bravas | 64 | |||
| Empire Lounge & Restaurant, The | Spicy Thai Shrimp Pasta | 164 | |||
| Greenbriar Inn, The | Garden Vegetable Risotto and Maine Lobster | 70 | |||
| Japango | Hamachi Carpacchio | 76 | |||
| Jax Fish House | Crab Cakes | 81 | |||
| John Lehndorff | Wild Blueberry Pie | 87 | |||
| Leaf | Udon Kombu Noodle Bowl | 90 | |||
| OAK at Fourteenth | Kale Salad | 94 | |||
| Post Brewing Company, The | Collard Greens | 105 | |||
| River & Woods | Root Vegetable Latkes | 108 | |||
| Roadhouse Boulder Depot | The "Jam" Burger | 114 | |||
| SALT | Butternut Squash Soup | 118 | |||
| Santo | Red Chile Posole | 126 | |||
| Shine | Ice Cream Sandwich | 130 | |||
| Steakhouse 316 | Oysters Rockefeller | 136 | |||
| Verde | Guacamole | 140 | |||
| West End Tavern | Campfire Brisket Beans | 145 | |||
| West Flanders Brewing | Mac + Cheese | 148 | |||
| Zolo Grill | Cactus & Corn Fritters | 152 |
| Restaurant | Recipe | Page # |
|---|---|---|
| Corrida | Bright Gin & Tonic | 65 |
| OAK at Fourteenth | Across the Atlantic | 95 |
| River & Woods | Passionfruit Habanero Mule | 110 |
| Steakhouse 317 | 20th Century Cocktail | 137 |
| Verde | Colorado Cadillac Margarita | 141 |
